The world of baking has changed a lot over the last few years because people are always looking for ways to enjoy sweet treats without spending hours in the kitchen using heavy tools. This chocolate lava mug cake recipe is the perfect answer for anyone who wants a warm and gooey dessert that tastes like it came from a fancy restaurant but actually takes less than five minutes to prepare from start to finish. You do not need a big oven or professional skills to make this happen because all you really need is a simple coffee cup and a standard microwave sitting on your counter. The magic of this dish lies in the way the center stays soft and liquid while the outside turns into a fluffy and light sponge cake that melts in your mouth with every single bite you take. It is a modern solution for busy people who still value the joy of a homemade dessert that feels personal and special even if it was made in a rush.
People absolutely love this recipe because it offers instant satisfaction and solves the problem of craving something sweet late at night when most bakeries are closed and you do not want to clean up a big mess. There is something very comforting about holding a warm mug in your hands while the smell of rich cocoa fills up the entire room and makes everything feel a little bit better after a long day. It is also a very forgiving recipe which means you can make small mistakes with the measurements and it will still come out tasting delicious and looking great for your social media photos. Kids love it because they can help mix the batter and watch it rise through the glass door of the microwave which feels like a fun science experiment that ends with a chocolate prize. It is the ultimate comfort food because it provides a sense of warmth and luxury without requiring you to buy expensive ingredients or spend a lot of money on delivery fees.
You should make this recipe whenever you feel like you deserve a little reward or when you have a friend over and want to serve them something impressive without looking like you tried too hard. It is perfect for rainy afternoons when you are curled up on the couch with a movie or for those moments when you finish a workout and want a small treat that fits into your lifestyle choices. Many people choose to make this because it is a single serving size which helps with portion control so you do not end up eating an entire giant cake by yourself over the weekend. The taste is deep and intense which satisfies your sugar cravings quickly while the emotional boost of eating chocolate is well known for helping people feel more relaxed and happy. Whether you are celebrating a small win at work or just trying to get through a tough Monday morning this mug cake acts as a little hug in a cup that reminds you to enjoy the simple pleasures in life.
Fitness enthusiasts often find ways to adapt this recipe because it is so easy to swap out traditional items for healthier versions like oat flour or natural sweeteners if they want to keep their goals on track. However even in its classic form this mug cake is better than store bought snacks because you know exactly what is going into your body and there are no strange chemicals or preservatives added to keep it fresh on a shelf. It represents a balance between health and happiness where you can enjoy the rich flavors of dark cocoa and creamy milk without feeling weighed down or sluggish afterwards. The texture is designed to be moist and tender which means it feels much more expensive and high quality than it actually is to make. Once you master the basic steps you will find yourself coming back to this recipe again and again because it is reliable and consistent and always delivers that perfect molten center that everyone dreams about when they think of chocolate.
Ingredients You Will Need
To make the perfect chocolate lava mug cake you will need to gather these simple items from your pantry and fridge before you start mixing everything together.
-
Four tablespoons of all purpose flour
-
Three tablespoons of granulated white sugar
-
Two tablespoons of unsweetened cocoa powder
-
Half a teaspoon of baking powder
-
One pinch of fine salt
-
Three tablespoons of whole milk
-
Two tablespoons of melted butter or vegetable oil
-
Half a teaspoon of pure vanilla extract
-
One large square of dark chocolate or two tablespoons of chocolate chips
-
One tablespoon of water
Step by Step Method
Follow these easy steps to create your dessert and remember that the order of mixing is important to keep the texture light and airy.
First you need to find a large microwave safe mug that can hold at least twelve ounces of liquid because the cake will rise quite high while it is cooking and you do not want it to spill over the sides. Use a small whisk or a fork to mix the flour and sugar and cocoa powder and baking powder and salt directly inside the mug until the color is even and there are no big lumps left in the dry mixture. This part is very important because it ensures that the rising agent is spread out so your cake does not have any flat spots.
Next you will add the wet ingredients which are the milk and the melted butter and the vanilla extract into the mug with the dry powder. Stir everything together very gently until the batter looks smooth and shiny and has a thick consistency like traditional cake mix. Make sure you scrape the bottom corners of the mug with your spoon so that no dry flour is left hiding at the base because that would ruin the final texture of your cake.
Now comes the secret part that creates the lava center which involves taking your chocolate square or your chocolate chips and pushing them right into the middle of the batter. Do not stir them in but just let them sink down slightly so they are covered by a thin layer of the cake mix. If you want an extra gooey center you can pour that one tablespoon of water directly over the top of the batter right before you put it in the microwave which helps create steam and keep the middle molten.
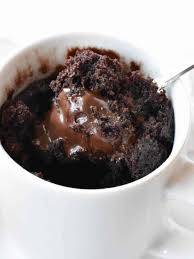
Place the mug in the center of your microwave and cook it on high power for about seventy to eighty seconds depending on how strong your microwave is at home. You will see the cake rise up past the rim of the cup and then sink back down slightly as the air escapes. When it is finished the edges should look firm and cooked through while the very center still looks a bit wet and shiny because that is where the melted chocolate lava is waiting for you.
Let the mug sit for at least two minutes before you try to eat it because the sugar gets very hot and you need to give the structure a moment to set so it does not fall apart. You can eat it straight out of the mug or you can run a knife around the edge and flip it onto a plate if you want to be fancy. Add a scoop of vanilla ice cream or a dusting of powdered sugar on top to finish it off and enjoy your warm creation immediately while it is still fresh.
Why This Recipe Is Special
This recipe is special because it bridges the gap between a quick snack and a gourmet dessert that usually requires a lot of technical skill to achieve. Most people think that making a molten lava cake requires tempering chocolate and using a water bath in the oven but this method proves that you can get similar results with much less effort. It is also special because it uses very basic ingredients that almost everyone already has in their kitchen so you never have to go on a special shopping trip just to satisfy a craving.
From a health perspective this version is better because it is a controlled portion which prevents the overeating that often happens when a whole cake is sitting on the counter. You can also easily control the quality of the ingredients by using organic milk or high quality dark chocolate which contains antioxidants that are good for your heart and your mood. The taste is a perfect balance of bitter cocoa and sweet sugar which creates a sophisticated flavor profile that appeals to both children and adults alike. It is a versatile base that allows you to be the boss of your own kitchen and change things up whenever you feel bored.
Extra Tips for Better Taste
If you want to take your mug cake to the next level you can try adding a tiny pinch of espresso powder to the dry ingredients because coffee actually makes the chocolate taste much deeper and more intense without making the cake taste like coffee. Another great tip is to use a piece of frozen chocolate ganache or even a spoonful of hazelnut spread in the center instead of a regular chocolate square to get a different kind of creamy texture.
For those who like a bit of crunch you can stir in some crushed walnuts or pecans after the batter is mixed but before you add the center piece of chocolate. You can also swap the vanilla extract for almond extract or peppermint extract if you want to create a seasonal flavor that feels like a holiday treat. If you find your cake is too dry you should try reducing the cook time by five seconds next time because every microwave has a different power level and even a few seconds can make a big difference in the final result.
Final Thoughts
This chocolate lava mug cake is more than just a quick recipe because it is a way to bring a little bit of magic into your daily routine without any stress or hard work. It teaches us that we do not need a lot of time or fancy equipment to create something beautiful and delicious that brings a smile to our faces. I hope you enjoy every warm and chocolatey bite of this cake and share the recipe with your friends and family so they can experience the joy of the five minute dessert too. Cooking should always be about having fun and treating yourself well and this mug cake is the perfect example of that philosophy in action.
Nutrition Details
Below is a table showing the estimated nutrition for one serving of this chocolate lava mug cake based on the standard ingredients listed above.
Disclaimer
Please keep in mind that everyone has a different body and different nutritional needs so the results of eating this dessert might vary from person to person. If you have specific health conditions or allergies you should always check with a doctor or a nutrition expert before trying new recipes or changing your diet. This article is meant for educational and entertainment purposes and is not a substitute for professional medical advice or personalized dietary planning.