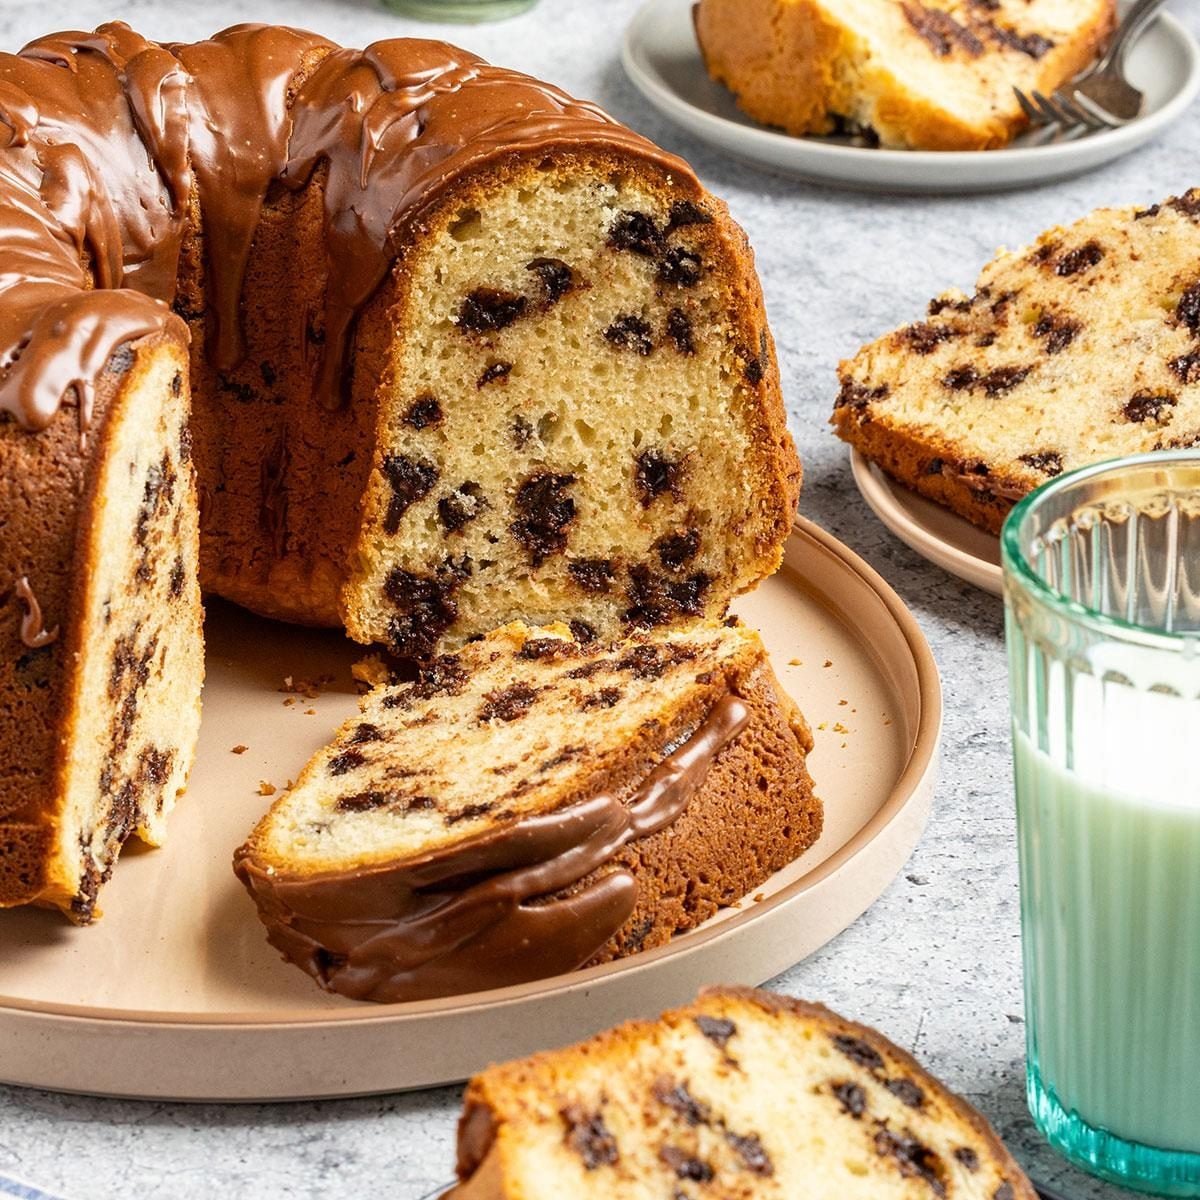
There is something truly magical about walking into a kitchen that smells like rich cocoa and warm sugar. It is the kind of scent that instantly makes you feel safe and happy no matter how tough your day was. This special recipe is all about creating the ultimate chocolate pound cake from scratch without any complicated steps. You do not need to be a professional baker with decades of experience to master this beautiful dessert because it relies on basic techniques that anyone can learn in minutes. We are talking about a deep chocolate flavor combined with a dense yet incredibly soft crumb that melts in your mouth with every single bite. It is a traditional comfort food brought into the modern kitchen with simple ingredients you likely already have in your pantry right now. By the time you finish baking this masterpiece you will have a deep appreciation for how simple pantry staples can transform into a luxury treat.
People absolutely adore this specific cake because it strikes the perfect balance between a rich fudge brownie and a traditional buttery sponge cake. Standard chocolate cakes can sometimes turn out too dry or too light but a pound cake has a signature weight that feels truly satisfying and decadent. Every slice holds its shape beautifully which makes it excellent for packing into lunch boxes or serving at elegant dinner parties without it crumbling into a mess. Kids love the intense chocolate taste while adults appreciate the subtle balance of sweetness and the deep notes of cocoa that linger on the tongue. It is also highly customizable so you can dress it up with fancy glazes or enjoy it completely plain with a simple mug of hot coffee. The sheer reliability of this recipe is why it quickly becomes a family favorite that people request over and over again for birthdays and weekend treats.
There are so many wonderful occasions that call for a fresh homemade chocolate pound cake and honestly sometimes just surviving a long week is reason enough. You can bake this to celebrate a major milestone or you can make it on a rainy Sunday afternoon when your family needs a little extra warmth and comfort. From an emotional standpoint baking this cake is a wonderful form of self care because the rhythmic mixing and the slow baking process help you slow down and enjoy the present moment. For those who watch their fitness this can serve as your ultimate cheat meal reward that makes all your hard work at the gym feel completely worth it. Instead of buying store cakes filled with strange chemicals you can feel proud serving this clean homemade version to your friends and loved ones. It fits beautifully into a holiday feast or a casual backyard picnic making it the most versatile dessert you will ever learn to create.
Baking for beginners can sometimes feel intimidating because science plays a big role in how cakes rise and stay moist throughout the baking process. That is exactly why this guide breaks down every single detail into plain words so you never have to guess what to do next. We will look at why we cream the butter and how room temperature ingredients can completely change the texture of your finished loaf. You are about to embark on a fun baking journey that will fill your home with joy and give you a huge boost of confidence in your cooking skills. Grab your favorite mixing bowls and put on your favorite apron because we are about to create something truly delicious together. Let us dive into the wonderful world of chocolate baking and discover how easy it is to make a restaurant quality dessert at home.
Ingredients You Will Need
To create this wonderful chocolate pound cake you will need to gather a few simple items from your kitchen. Please make sure all your refrigerated items sit on the counter for a while before you start because room temperature ingredients blend together much better.
-
Unsalted butter at room temperature: 226 grams (which is exactly two full sticks)
-
White granulated sugar: 400 grams (about two cups)
-
Large whole eggs at room temperature: 5 pieces
-
Pure vanilla extract: 10 milliliters (about two teaspoons)
-
All purpose flour: 250 grams (about two cups)
-
Unsweetened cocoa powder: 75 grams (about three fourths of a cup)
-
Baking powder: 5 grams (about one teaspoon)
-
Fine sea salt: 3 grams (about half a teaspoon)
-
Whole milk at room temperature: 120 milliliters (about half a cup)
-
Semi sweet chocolate chips: 100 grams (optional for extra chocolate flavor)
Step by Step Method
Step One: Preparation
Before you start mixing anything you must preheat your oven to 165 degrees Celsius or 325 degrees Fahrenheit. Taking this step early ensures that your oven reaches the exact right temperature by the time your cake batter is ready to go inside. Next you need to prepare your loaf pan which should measure about nine inches by five inches. Take a small piece of butter and rub it all over the inside walls and bottom of the pan to prevent sticking. After that sprinkle a tablespoon of cocoa powder inside the pan and shake it around until every greasy spot is covered. Tap the pan upside down over your sink to get rid of any extra loose powder. This clever trick keeps your cake from sticking and avoids leaving white flour marks on your beautiful dark chocolate crust.
Step Two: Mixing Dry Ingredients
Find a medium sized mixing bowl and place a fine wire strainer or sifter right over the top of it. Pour your all purpose flour, unsweetened cocoa powder, baking powder, and fine sea salt into the strainer. Gently shake or tap the strainer until all the dry ingredients pass through into the bowl below. Sifting is a very important step because cocoa powder loves to form stubborn little lumps that can ruin the texture of your cake batter. Use a whisk to stir these dry ingredients together for a few seconds until the color is a uniform light brown. Set this bowl aside for a few minutes while we move on to the wet ingredients.
Step Three: Creaming Butter and Sugar
Place your softened unsalted butter and your white granulated sugar into a large mixing bowl or into the bowl of your stand mixer. Turn your mixer on to a medium speed and let it beat the butter and sugar together for about five full minutes. Do not rush this step because creaming actually forces tiny pockets of air into the butter which helps your pound cake rise beautifully without becoming too heavy. Watch the mixture closely as it changes from a yellow gritty paste into a pale fluffy cream that looks almost like white frosting. Stop the mixer once or twice during this process to scrape down the sides of the bowl with a rubber spatula.
Step Four: Adding Eggs and Vanilla
Keep your mixer on a low speed now as you begin adding your five large eggs one at a time. Drop the first egg into the butter mixture and let it blend completely until you can no longer see any yellow streaks before adding the next one. Adding the eggs slowly prevents the rich butter mixture from separating or curdling. Once all five eggs are fully mixed into the batter pour in your pure vanilla extract and blend for ten more seconds. At this point your batter should look very smooth, creamy, and slightly puffed up.
Step Five: Combining Wet and Dry
Now you will add your dry flour mixture and your whole milk to the butter mixture in alternating turns. Start by pouring about one third of your flour mixture into the big bowl and mix on low speed just until the flour disappears. Next pour in about half of your whole milk and mix gently until it combines with the batter. Repeat this pattern by adding another third of the flour, then the remaining milk, and finally the last of the flour. Always start and finish with the flour mixture because this technique keeps your batter stable and prevents it from getting tough. Stop mixing the very moment the last patch of white flour disappears because overmixing will make your cake rubbery. If you want to use chocolate chips you can gently fold them into the thick batter now using a rubber spatula.
Step Six: Baking the Cake
Use your spatula to scrape the thick chocolate batter out of your mixing bowl and into your prepared loaf pan. Smooth out the top surface with the back of a spoon so it bakes evenly across the pan. Pick up the pan and gently tap it against your kitchen counter twice to pop any large air bubbles hidden inside the batter. Place the pan on the center rack of your preheated oven and close the door gently. Let the cake bake undisturbed for about sixty to seventy minutes. You will know it is getting close when your entire house smells like a chocolate paradise and the top of the cake forms a beautiful deep crack down the center.
Step Seven: Testing for Doneness
Since every oven behaves a little differently you must test the cake before taking it out for good. Insert a long wooden toothpick or a metal skewer straight into the deepest part of the center crack. Pull the toothpick straight back out and look at it closely. If it comes out clean or with just a few moist crumbs attached your cake is perfectly done. If you see wet chocolate batter on the stick close the oven door and let it bake for five more minutes before testing again.
Step Eight: Cooling Process
Once your cake passes the toothpick test carefully remove it from the oven using thick oven mitts. Set the hot pan down on a wire cooling rack and leave it completely alone for twenty minutes. The cake is very delicate while hot and needs this time to firm up inside the pan. After twenty minutes run a butter knife gently around the inside edges of the pan to make sure no parts are stuck. Place the wire rack on top of the pan, flip everything upside down together, and gently lift the pan away. Allow the chocolate pound cake to cool down completely to room temperature before you try to slice it.
Why This Recipe Is Special
This chocolate pound cake stands out from the crowd because it delivers an incredibly intense cocoa flavor without requiring complex melting techniques. Many recipes force you to melt solid bars of chocolate over boiling water which adds extra dishes and extra room for mistakes. By using high quality cocoa powder we get all that rich dark flavor with a much simpler mixing process that saves you time. The structural texture is also a triumph because it manages to stay dense and velvety without ever feeling dry or chalky on your tongue.
From a health perspective making this cake at home gives you absolute control over what goes into your body. You do not have to worry about high fructose corn syrup, artificial preservatives, or chemical dyes that commercial bakeries use to keep cakes fresh on store shelves for weeks. Every single ingredient in this recipe is a real whole food that you can recognize and pronounce. Plus cocoa powder itself is naturally packed with antioxidants which can help boost your mood and bring a sense of joy to your day. It is a honest honest treat that satisfies your sweet tooth completely so you feel satisfied with just one proper slice.
Another beautiful thing about this recipe is how incredibly well it stores over time. In fact many people find that this cake tastes even better the second day because the chocolate flavors have more time to mature and blend together. It does not dry out quickly like a standard sponge cake thanks to the generous amount of real butter holding the moisture inside. It serves as a wonderful baseline recipe that you can master once and then use as a foundation for your own baking experiments for years to come.
Extra Tips for Better Taste
To take your chocolate pound cake to the next level try adding a single teaspoon of instant espresso powder to your dry ingredients. Coffee acts like a secret amplifier for chocolate making it taste much deeper and richer without actually adding any coffee flavor to the cake. Another wonderful trick is to use high quality Dutch process cocoa powder if you can find it at your local store. This type of cocoa is treated to reduce natural acidity which gives your cake a much darker color and a smoother taste.
If you love textures you can chop up some toasted walnuts or pecans and fold them into the batter right at the end. The crunchy nuts offer a fantastic contrast to the soft dense crumb of the traditional pound cake. For an ultra luxurious presentation you can make a quick warm glaze by melting together equal parts of chocolate chips and heavy cream. Pour this shiny glaze right over the cooled cake and let it drip down the sides before serving to your guests.
You can also experiment with different liquids instead of standard whole milk to change the flavor profile. For example using rich buttermilk adds a subtle tangy flavor that cuts through the sweetness and makes the cake even more moist. A splash of orange extract or a tablespoon of fresh orange zest added to the batter creates a classic chocolate orange combination that feels very festive. Always remember to slice your cake with a long serrated knife using a gentle sawing motion to get perfectly clean slices every time.
Final Thoughts
Baking a homemade chocolate pound cake is a beautiful way to show love to your family, your friends, and even to yourself. There is a special kind of pride that comes from pulling a perfect dark loaf out of your own oven and sharing it with the people you care about most. This simple recipe proves that you do not need expensive tools or secret skills to create something truly magnificent in your kitchen. As you sit down to enjoy your first rich slice with a cold glass of milk or a hot cup of tea take a moment to celebrate what you made. May this recipe bring warmth to your home and become a delicious tradition that you turn to for many years to come.
Nutrition Details
Here is an estimated breakdown of the nutritional content for this homemade chocolate pound cake. These numbers are calculated based on cutting the loaf into twelve equal slices. Keep in mind that your numbers may vary slightly depending on the specific brands of ingredients you choose to buy at your local supermarket.
| Nutrient Type | Amount Per Serving | Daily Percentage Value |
| Calories | 395 calories | 20 percent |
| Total Fat | 18 grams | 23 percent |
| Saturated Fat | 11 grams | 55 percent |
| Cholesterol | 115 milligrams | 38 percent |
| Sodium | 140 milligrams | 6 percent |
| Total Carbohydrates | 54 grams | 20 percent |
| Dietary Fiber | 3 grams | 11 percent |
| Total Sugars | 34 grams | 68 percent |
| Protein | 6 grams | 12 percent |
| Calcium | 45 milligrams | 4 percent |
| Iron | 2 milligrams | 11 percent |
Disclaimer
Please remember that everyone has a unique body and individual health needs that vary based on age, lifestyle, and genetics. This recipe is meant for enjoyment and general home cooking purposes rather than medical dietary management. If you have specific health conditions, food allergies, or strict fitness goals you should consult with a certified doctor or a registered dietitian. The nutritional values provided above are estimations created with a standard food data calculator and should not be taken as professional medical advice. Individual baking results may change depending on your kitchen altitude, oven accuracy, and ingredient temperatures. Enjoy your baking journey safely and listen to what your own body needs to stay healthy and balanced.