Homemade Chocolate Crunch Bars
Making your own chocolate crunch bars at home is one of the most rewarding and simple kitchen projects you can ever start. This recipe is all about taking high quality chocolate and mixing it with light and airy puffed rice cereal to create a snack that is both crispy and smooth. Most of us remember buying these bars from the store when we were younger but making them in your own kitchen allows you to use much better ingredients. You get to choose the type of chocolate you like best whether it is a creamy milk chocolate or a rich and dark cocoa blend. There are no complicated steps or baking required which makes this a perfect entry point for anyone who feels a little nervous about cooking. You are essentially creating a gourmet version of a childhood classic that will taste fresher and more flavorful than anything wrapped in plastic at a gas station. By the time you finish this process you will have a huge batch of treats that look professional and taste absolutely incredible to every person who tries a piece.
People truly love this recipe because it provides a perfect balance of textures that is very satisfying to eat at any time of the day. There is something deeply comforting about the snap of cold chocolate followed by the light crunch of toasted rice cereal in every single bite you take. It is a nostalgic treat that brings back happy memories for adults while being an instant favorite for children who enjoy the simple and sweet flavors. Unlike many other desserts that can feel very heavy or overly complex this one is light enough to enjoy as a quick afternoon pick me up. Many food lovers also appreciate the fact that you can customize the thickness of the bars to suit your own personal preference perfectly. You can make them thin and delicate or thick and chunky depending on the size of the pan you decide to use in your kitchen. This flexibility is a big part of why people keep coming back to this specific recipe whenever they have a craving for something sweet and crunchy.
You should consider making these chocolate crunch bars whenever you need a quick boost of happiness or want to share a special treat with your friends and family. They are the ideal choice for birthday parties or school events where you need a snack that is easy to transport and does not require any forks or plates to serve. From an emotional perspective making candy at home is a great way to decompress after a busy week because the process of melting chocolate is very calming and smells wonderful. If you are looking at it from a fitness or health angle making these yourself is much better than buying processed snacks because you control the sugar content. You can use a dark chocolate with a high cocoa percentage to get those healthy antioxidants while avoiding the strange chemicals and preservatives found in factory made candy. It is also a fantastic way to reward yourself after a tough workout or a long day of chores without feeling like you are eating something completely artificial. Having a container of these in your fridge means you always have a high quality treat ready to go whenever the mood strikes you.
Another great reason to make this recipe is that it is incredibly cost effective and saves you a lot of money compared to buying individual candy bars over time. You can buy the ingredients in bulk and produce several dozens of bars for just a fraction of the price you would pay at a premium chocolate shop. It also serves as a wonderful gift idea because you can wrap the finished bars in colorful foil or clear bags to give to neighbors and coworkers during the holidays. This recipe teaches you the basic principles of working with chocolate such as how to melt it gently so it stays shiny and smooth without burning. Learning these simple skills builds your confidence in the kitchen and might even inspire you to try more advanced chocolate making projects in the future. The joy of seeing a liquid bowl of chocolate transform into a solid and crunchy snack is a magical experience that never gets old no matter how many times you do it. So clear some space on your counter and get your bowls ready because you are about to create the best chocolate bars you have ever tasted in your life.
Ingredients You Will Need
-
24 ounces of high quality milk chocolate chips
-
12 ounces of semi sweet chocolate chips for balance
-
3 cups of crispy puffed rice cereal
-
2 tablespoons of refined coconut oil
-
1 teaspoon of pure vanilla extract
-
1 fourth teaspoon of fine sea salt
-
1 tablespoon of honey or maple syrup for extra shine
Step by Step Method
Step 1 Prepare Your Workspace
Start by taking a 9 by 13 inch rectangular baking pan and lining it with parchment paper. It is very important to leave a little bit of the paper hanging over the long edges of the pan. This creates handles that will allow you to lift the entire block of chocolate out once it has set and hardened in the refrigerator.
Step 2 Set Up a Double Boiler
Fill a medium pot with about two inches of water and bring it to a very gentle simmer on your stove. Place a large glass or metal bowl on top of the pot making sure the bottom of the bowl does not actually touch the hot water. This indirect heat is the safest way to melt chocolate without the risk of scorching or burning it.
Step 3 Melt the Chocolate
Pour all of the milk chocolate chips and the semi sweet chocolate chips into the bowl. Add the coconut oil to the mix as well. Stir the chocolate constantly with a rubber spatula as it begins to soften. The coconut oil helps the chocolate melt more smoothly and gives the final bars a beautiful glossy finish that looks like it came from a professional shop.
Step 4 Add the Flavorings
Once the chocolate is completely liquid and smooth remove the bowl from the heat. Stir in the vanilla extract and the sea salt and the honey. The salt is a secret ingredient because it actually makes the chocolate taste more intense and prevents the bar from being too sugary or one dimensional in flavor.
Step 5 Incorporate the Crunch
Slowly pour the puffed rice cereal into the bowl of melted chocolate. Use your spatula to gently fold the cereal into the liquid. You want to make sure every single piece of rice is fully coated in chocolate so there are no dry spots. Be careful not to crush the cereal too much because you want to keep that airy and light texture intact.
Step 6 Fill the Pan
Pour the chocolate and rice mixture into your prepared baking pan. Use the back of a spoon or your spatula to spread it out into an even layer that reaches all the corners. If you want very thick bars you can use a smaller pan like an 8 by 8 inch square dish instead.
Step 7 Smooth the Top
Gently tap the pan on your counter a few times to help the chocolate settle and to remove any air bubbles that might be trapped inside. This ensures your bars are solid and do not have gaps when you cut into them later.
Step 8 Let It Set
Place the pan in your refrigerator and let it chill for at least two to three hours. The chocolate needs to be completely firm and cold before you try to move it. If you are in a rush you can put it in the freezer for about forty five minutes but the refrigerator is usually better for the texture.
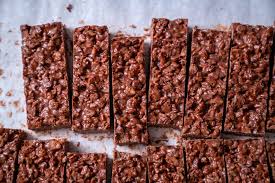
Step 9 Cut the Bars
Once the chocolate is solid use the parchment paper handles to lift the block out of the pan and place it on a large cutting board. Use a long sharp knife to cut the block into rectangles or squares of whatever size you prefer. If the chocolate is very hard you can let it sit at room temperature for five minutes to make cutting easier.
Step 10 Storage
Place your finished crunch bars in an airtight container. You can store them in the refrigerator for up to two weeks or in the freezer for even longer. They are best served cold because they have that perfect snap that everyone loves in a chocolate bar.
Why This Recipe Is Special
This recipe is special because it puts the power of quality control back into your hands while delivering a taste that is superior to commercial products. By using a mix of milk and semi sweet chocolate you create a complex flavor that appeals to both children and adults. From a health perspective you are avoiding high fructose corn syrup and artificial wax coatings that are often used in cheap candy to keep it from melting. The addition of coconut oil provides a source of healthy fats and ensures the bars have a melt in your mouth quality that is hard to find elsewhere. It is also a very inclusive recipe because you can easily swap the chocolate for a dairy free version to make it vegan friendly for friends with allergies. The simplicity of the process means you can focus on the quality of the cocoa which is where the real benefit lies for your taste buds and your heart health.
Extra Tips for Better Taste
If you want to make these bars even more exciting you can try toasting your puffed rice cereal in a dry pan for two minutes before adding it to the chocolate. This adds a nutty aroma and makes the crunch even louder. You could also stir in a half cup of peanut butter to the melted chocolate if you love the combination of chocolate and nuts. For a more sophisticated version try sprinkling a little bit of coarse flaky sea salt over the top of the bars before they go into the fridge to set. You can even add dried fruit like cranberries or raisins if you want a bit of chewiness to go along with the crunch. If you find that your chocolate is too thick while melting just add one more teaspoon of coconut oil to thin it out to the perfect consistency.
Final Thoughts
Homemade chocolate crunch bars are a delightful reminder that the best things in life are often the simplest to create. This recipe is a wonderful way to bring a little bit of sweetness into your home without needing a lot of time or expensive equipment. We hope you enjoy the process of making these and find as much joy in eating them as we do. Whether you share them with neighbors or keep them all for yourself these bars are sure to become a favorite in your household. Happy snacking and enjoy the wonderful crunch of your new favorite homemade treat.
Nutrition Details
| Nutrient | Amount Per Serving |
| Calories | 210 calories |
| Total Fat | 12 grams |
| Saturated Fat | 8 grams |
| Cholesterol | 5 milligrams |
| Sodium | 60 milligrams |
| Total Carbohydrates | 26 grams |
| Dietary Fiber | 2 grams |
| Sugars | 18 grams |
| Protein | 3 grams |
The values above are based on a single serving which is one bar if the batch is cut into 24 pieces.
Disclaimer
Please keep in mind that the nutritional information provided in this article is only an estimate based on common ingredients. Everyone has a different body and your specific health needs may require different types of food or portion sizes. The results of this recipe may change depending on the brands of chocolate or cereal you choose to buy at your local store. If you have any medical conditions like heart disease or diabetes you should always check with your doctor before adding high sugar snacks to your diet. Always supervise children when using the stove or handling hot bowls to ensure everyone stays safe in the kitchen.